Search Result 1
Lorem Ipsum is simply dummy text of the printing and typesetting industry. Lorem Ipsum has been the industry's standard dummy text ever since the 1500s, when an unknown printer took a galley of type and scrambled it to make a type specimen book.
Search Result 1
Lorem Ipsum is simply dummy text of the printing and typesetting industry. Lorem Ipsum has been the industry's standard dummy text ever since the 1500s, when an unknown printer took a galley of type and scrambled it to make a type specimen book.
Search Result 1
Lorem Ipsum is simply dummy text of the printing and typesetting industry. Lorem Ipsum has been the industry's standard dummy text ever since the 1500s, when an unknown printer took a galley of type and scrambled it to make a type specimen book.
Search Result 1
Lorem Ipsum is simply dummy text of the printing and typesetting industry. Lorem Ipsum has been the industry's standard dummy text ever since the 1500s, when an unknown printer took a galley of type and scrambled it to make a type specimen book.
Search Result 1
Lorem Ipsum is simply dummy text of the printing and typesetting industry. Lorem Ipsum has been the industry's standard dummy text ever since the 1500s, when an unknown printer took a galley of type and scrambled it to make a type specimen book.
Search Result 1
Lorem Ipsum is simply dummy text of the printing and typesetting industry. Lorem Ipsum has been the industry's standard dummy text ever since the 1500s, when an unknown printer took a galley of type and scrambled it to make a type specimen book.
Search Result 1
Lorem Ipsum is simply dummy text of the printing and typesetting industry. Lorem Ipsum has been the industry's standard dummy text ever since the 1500s, when an unknown printer took a galley of type and scrambled it to make a type specimen book.
Search Result 1
Lorem Ipsum is simply dummy text of the printing and typesetting industry. Lorem Ipsum has been the industry's standard dummy text ever since the 1500s, when an unknown printer took a galley of type and scrambled it to make a type specimen book.
Getting Started
What is beki?
beki is a powerful Meta DSP (Demand-Side Platform) that serves as a foundational platform for managing and optimizing digital advertising campaigns across various channels, including Google Ads, DV360, and Facebook. beki's primary function is to streamline the advertising process by offering a unified hub for advertisers to manage their campaigns effectively.
One of beki's standout features is its ability to enable users to execute campaigns on DV360, even if they don't have their dedicated seat on the platform. This democratizes access to DV360, allowing more advertisers to leverage its capabilities without the traditional constraints.
beki offers a consolidated dashboard that brings together data and insights from different advertising platforms, providing users with a comprehensive view of their campaign performance and results. This unified approach simplifies campaign monitoring and reporting, making it easier for advertisers to make informed decisions.
One of beki's key strengths is its AI-based optimization suggestions. By leveraging artificial intelligence, beki can analyze campaign data and user goals to provide actionable recommendations for improving campaign performance across all integrated platforms. This data-driven approach helps advertisers maximize their ROI and achieve their desired outcomes.
Sign Up and Set up beki
Sign Up with Your Business Info:
To get started with beki, the first step is to sign up. It's a breeze! Just provide your business information, and you'll be on your way.
Link Your Advertising Platforms:
If you're already running ads on platforms like Facebook Ads, Google Ads, or DV360, you can easily link them to beki. If not, no worries – you can use beki's own seat on these platforms.
Linking is as simple as a few clicks, and it ensures beki can access your ad accounts to help you manage your campaigns effectively.
Campaign Integration:
Once your accounts are linked, beki will work its magic. It'll start fetching information about your current ad campaigns from the platforms.
Alternatively, you can create new campaigns right from beki in real-time. It's super convenient and saves you time.
Campaign Setup Made Easy:
beki streamlines the campaign setup process. You don't need to be a tech guru to use it. You can set up your campaigns with just a few clicks.
If you're new to this, beki offers helpful guidance to make sure your campaigns are optimized for success.
Goal Mapping for Better ROI:
To get the best return on investment (ROI) from your campaigns, you can map your campaigns to specific goals.
Whether it's driving website traffic, generating leads, or increasing sales, beki helps align your campaigns with your business objectives.
How long is the trial for?
The trial period for beki lasts for 14 days. During this time, you can explore and use beki's features and services to determine if it meets your needs and requirements.
What happens when the trial expires?
As you start your free trial, please keep in mind that after 7 days of usage, you'll receive reminder emails encouraging you to consider upgrading your account. These reminders are there to help you make an informed choice about your subscription.
Once your trial period ends, if you choose not to upgrade, your account will enter a semi-suspended state. During this time, you'll still have access to your dashboard, but some features like the optimizer and campaign configuration will be temporarily frozen. You'll still be able to view the data fetched during your trial period, making it easier to decide how you want to proceed.
Ad Platforms
How do I connect my Facebook Ads accounts?
Go to Your Admin Tab: First, log in to your advertising dashboard and head over to the "Admin" section.
Select Advertiser Configuration: Within the Admin section, look for an option called "Advertiser Configuration".Click on it.
Choose Facebook as Your Platform: In the Advertiser Configuration menu, you'll see a list of advertising platforms. Find "Facebook" and select it.
Log In with Facebook: After selecting Facebook, you'll likely be prompted to log in. Go ahead and click on the "Login with Facebook" button.
Link Your Account: Follow the login prompts to connect your Facebook Ads account to your advertising dashboard.
Can I connect multiple Facebook ad accounts?
Yes, Linking multiple Facebook accounts follows a similar process to connecting a single account.
Can I connect to more than one Facebook profile?
Yes, you can link multiple profiles. However, please keep in mind that your ability to link profiles may depend on your subscription plan.
How do I connect my Google Ads accounts
Access Your Admin Section: Start by logging into your advertising dashboard. Then, navigate to the "Admin" section.
Select Advertiser Configuration: Inside the Admin area, search for an option named "Advertiser Configuration". Click on it to proceed.
Choose Google Ads as Your Platform: In the Advertiser Configuration menu, you'll find a list of advertising platforms. Locate "Google Ads" and click on it.
Log In with Google: After selecting Google Ads, you may be prompted to log in. Click on the "Login with Google" button to continue.
Connect Your Google Ads Account: Follow the login instructions to link your Google Ads account to your advertising dashboard.
What is a beki seat?
"beki seat" is essentially for people who don't have their own accounts for platforms like Google Ads, Facebook Ads, or DV360. It allows them to advertise without needing their own dedicated accounts on these platforms. It's like a way for newcomers or those without their own accounts to still participate in online advertising.
What to do if I don’t have my own account or How to use beki seat?
Access the Admin Section: First, log in to your beki account. Start by logging into your advertising dashboard. Then, navigate to the "Admin" section.
Navigate to Advertiser Configuration: Once you're in the admin section, look for the "Advertiser Configuration" option. This is usually where you set up and manage different advertising-related settings.
Select Platform Name: Under the Advertiser Configuration section, you'll find a list of platforms you can connect to. Choose the platform for which you want to use beki Seat. This could be a specific advertising platform like Facebook, Google Ads, or DV360
Access the Platform Link Page: After selecting the platform, you'll typically be directed to a specific page related to that platform.
Enable beki Seat: Look for an option that says "Use beki Seat. Click this option to indicate that you want to use beki Seat with this platform.
Dashboard
How do you check your campaign insights?
To check your campaign insights, go to the unified dashboard. Use filters like platform, campaign, creative type to analyze performance data. This helps you make informed decisions and improve your campaigns
Media Plan
How to Generate a Media Plan ?
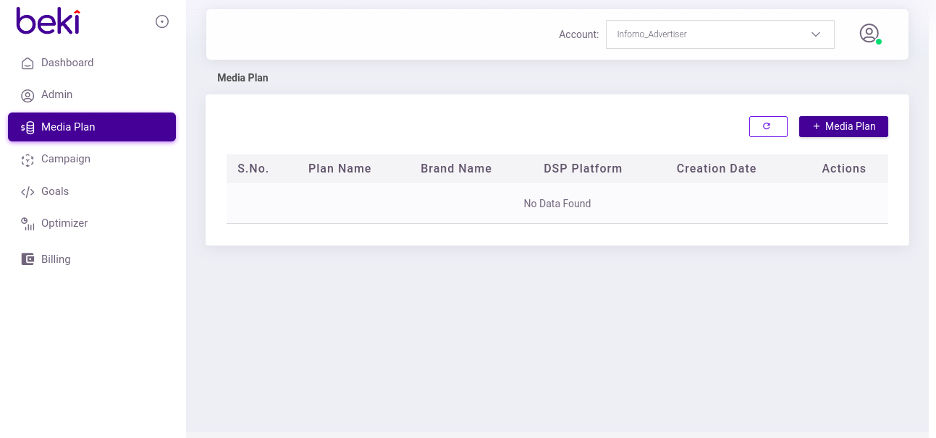
⦁ Access Media Plan: Start by opening your Beki account and locating the "Media Plan" option in the menu.
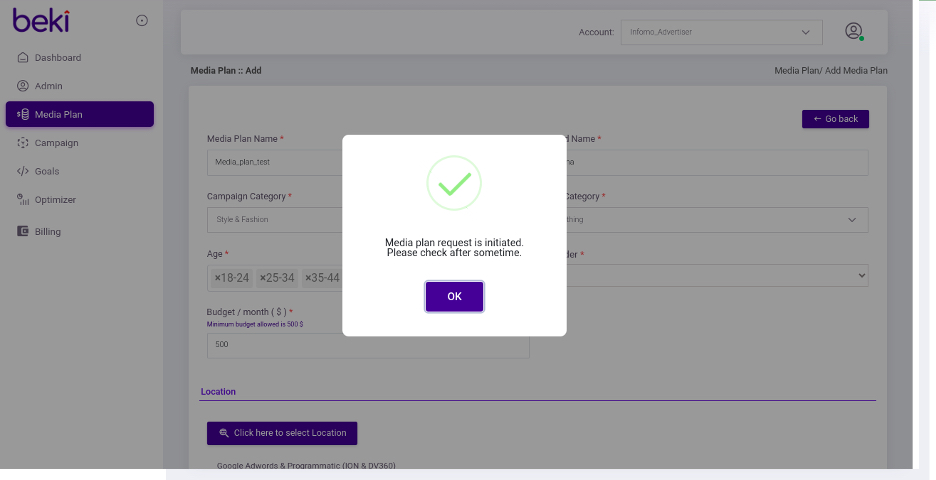
⦁ Create a New Plan: Once you're in the Media Plan section, look for the "+Media Plan" button and click on it to start a new plan.
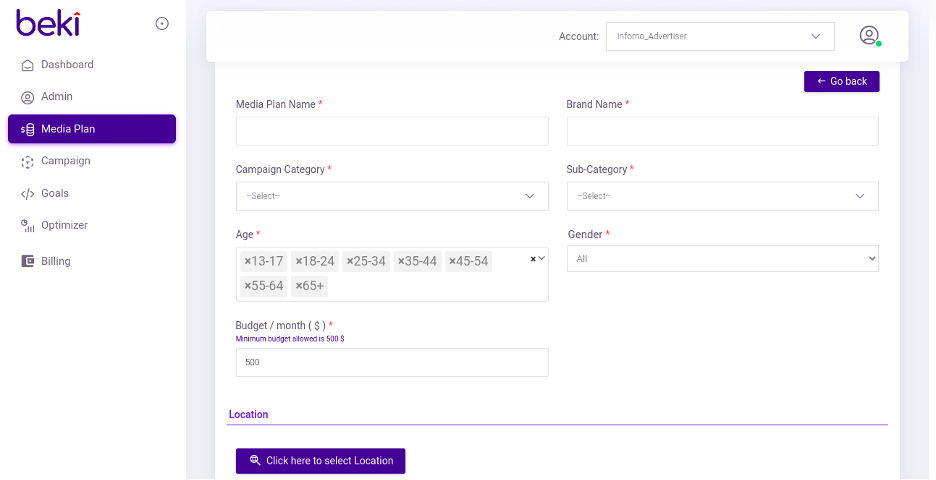
⦁ Name Your Media Plan: Give your media plan a name. It's a good idea to use your project name for clarity.
⦁ Enter Brand Information: Next, provide the name of the brand you're creating this plan for.
⦁ Select Category and Sub-Category: Choose the appropriate category and sub-category from the options provided. This helps tailor your plan to your specific industry or niche.
⦁ Define Your Target Audience: Specify the age segment and gender of your target audience. This ensures that your media plan is optimized for reaching the right people.
⦁ Set Your Monthly Budget: Enter your monthly budget for the campaign. The minimum budget is typically $500, but you can adjust this based on your goals and resources.
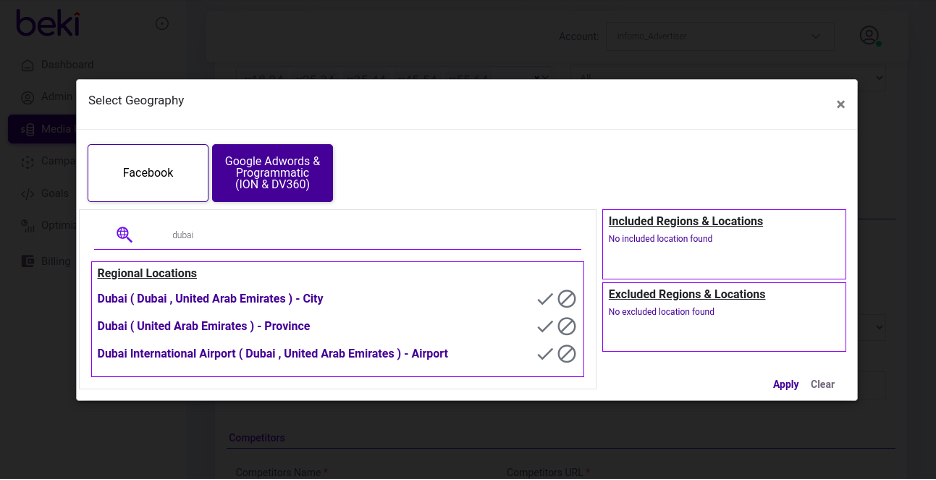
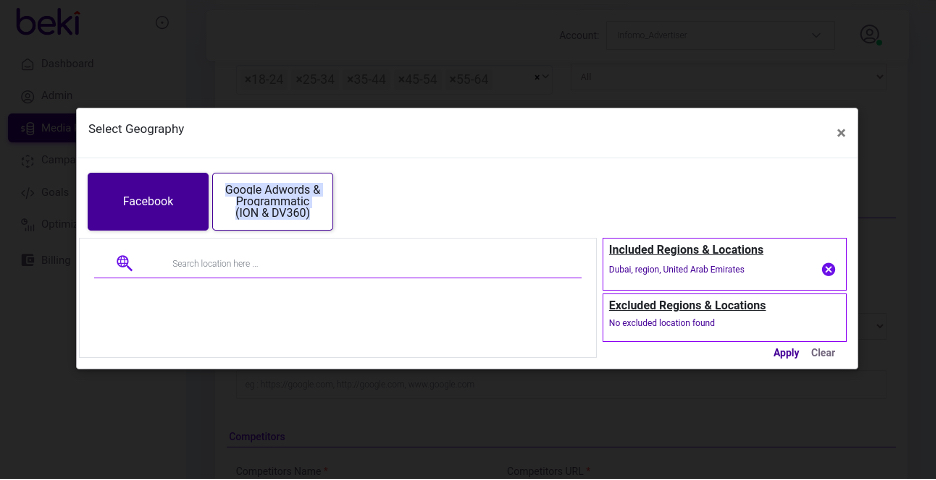
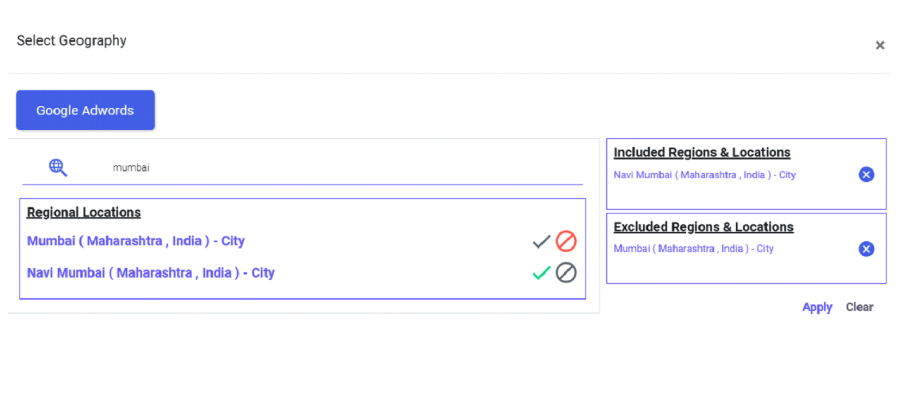
⦁ Choose Your Target Locations: Select the geographical locations where you want your campaign to run. The names of these locations may vary depending on the platform.
⦁ Include or Exclude Locations: Decide if you want to include or exclude specific locations within your chosen geographical area.
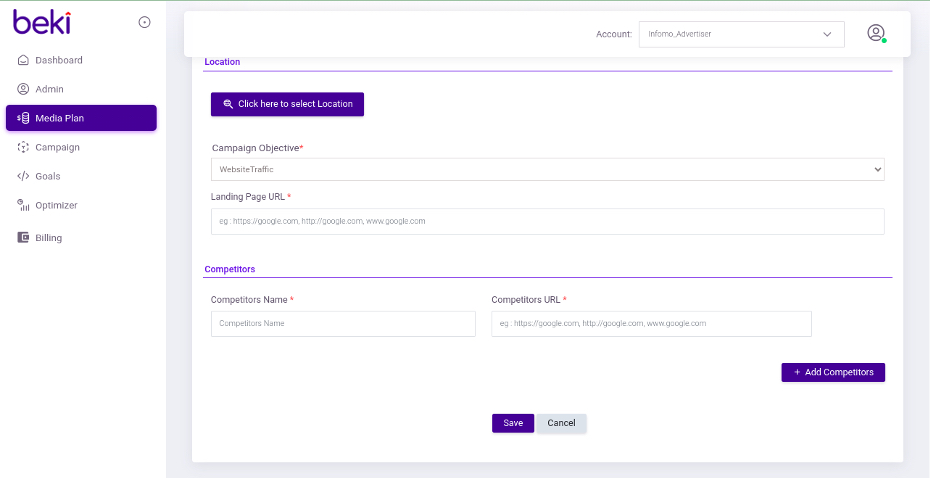
⦁ Specify Campaign Objective: Determine the primary goal of your campaign. Options often include website traffic, branding and reach, conversion, or lead generation.
⦁ Provide Landing Page URL: Enter the URL of the landing page where you want your audience to go when they click on your ads..
⦁ Add Competitor Information: Include the names of your competitors and their website URLs. This information helps Beki tailor your media plan effectively..
⦁ Save Your Media Plan: Click the "Save" button to initiate the media plan generation process. Keep in mind that this might take around 15 minutes to complete, depending on the complexity of your plan.
⦁ Download Your Media Plan: Once the media plan is generated, you can download it by clicking on the "Action" button or a similar option. This will provide you with a detailed plan that you can use for your marketing campaign.
Campaign Creation
Creating Campaign for Google - Search Campaign
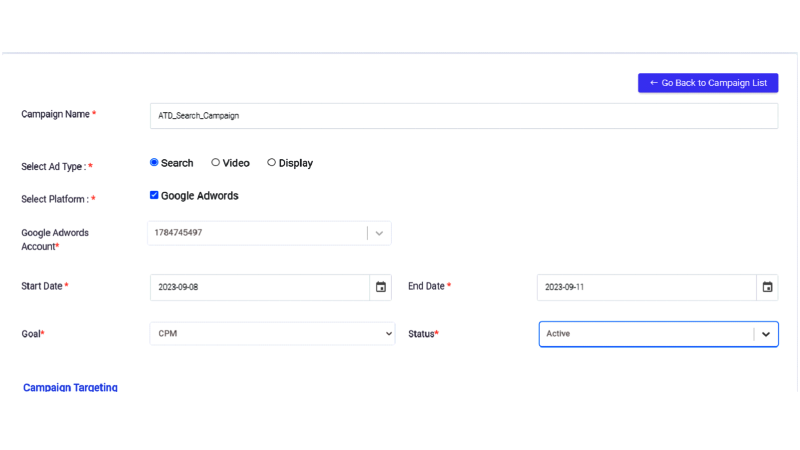
⦁ To kick off your Google Search campaign, first, you need to name your campaign and choose "Search" as the ad type.
⦁ After selecting the ad type, you'll need to pick "Google AdWords" as the platform and set a start and end date for your campaign. You'll also need to decide on your campaign goals, such as CPM, CPC, CPA, etc., and set the campaign status to "Active."
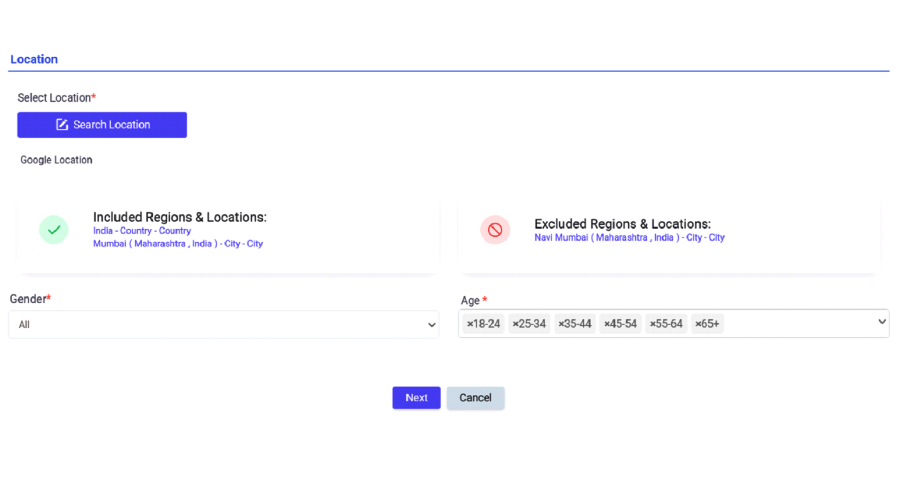
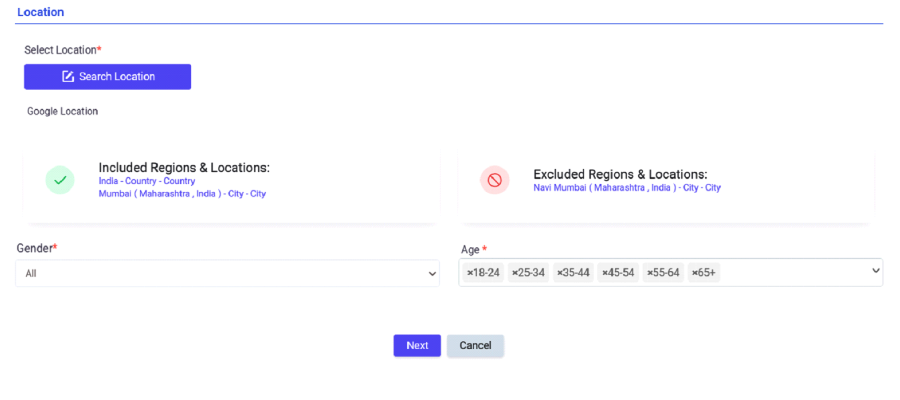
⦁ The next step is campaign targeting. You can start by choosing the target devices (usually mobile, tablet, and desktop), and then specifying the location, age, and gender of your audience.
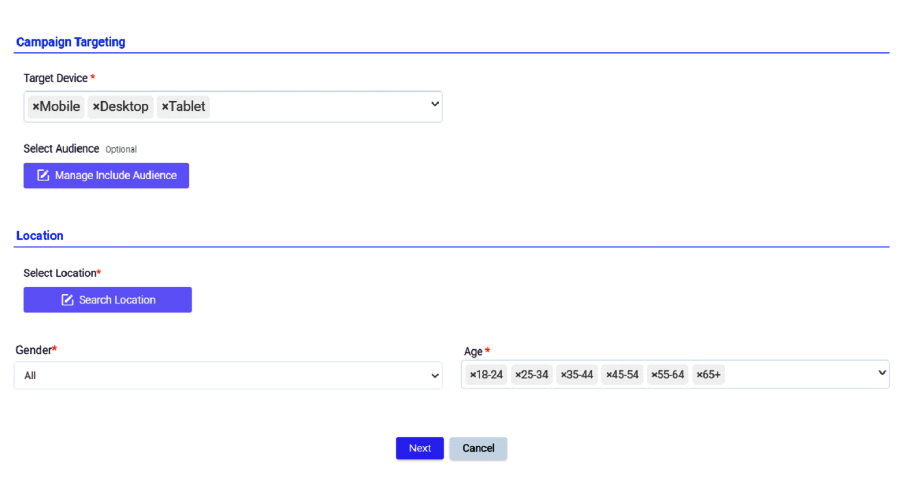
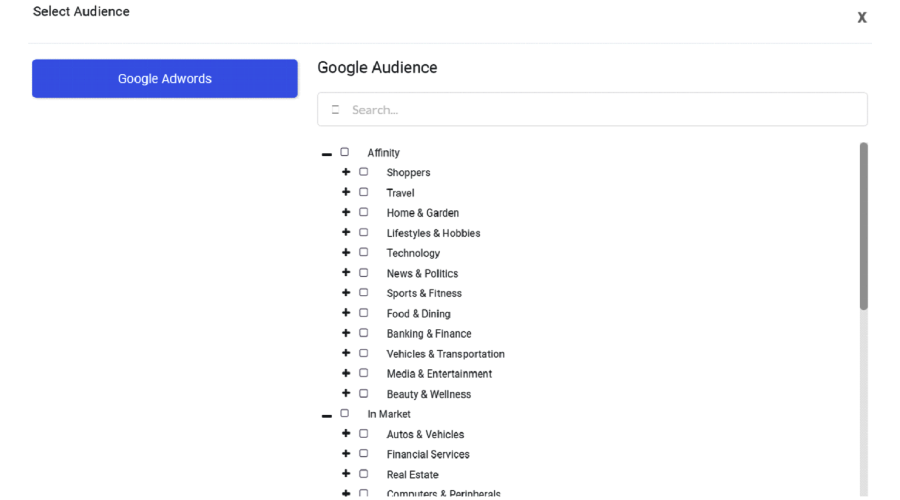
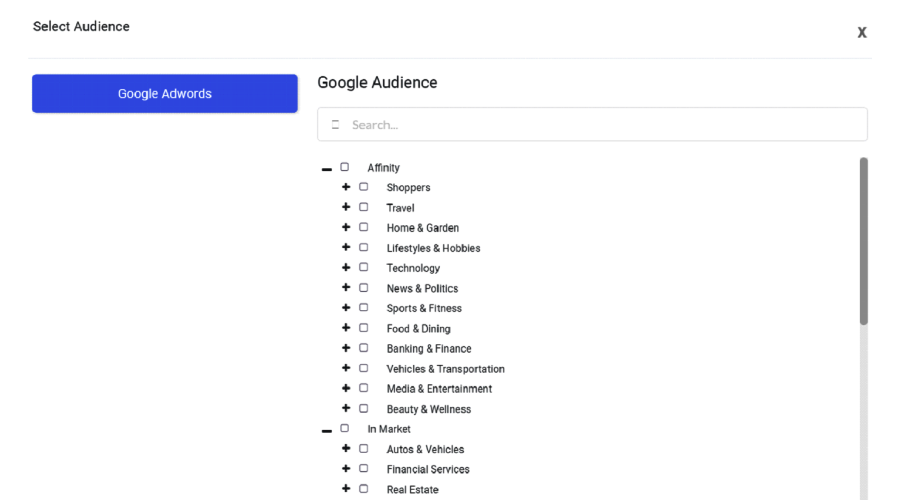
⦁ After that, you can select audiences from the "Affinity" and "In-Market" tabs.
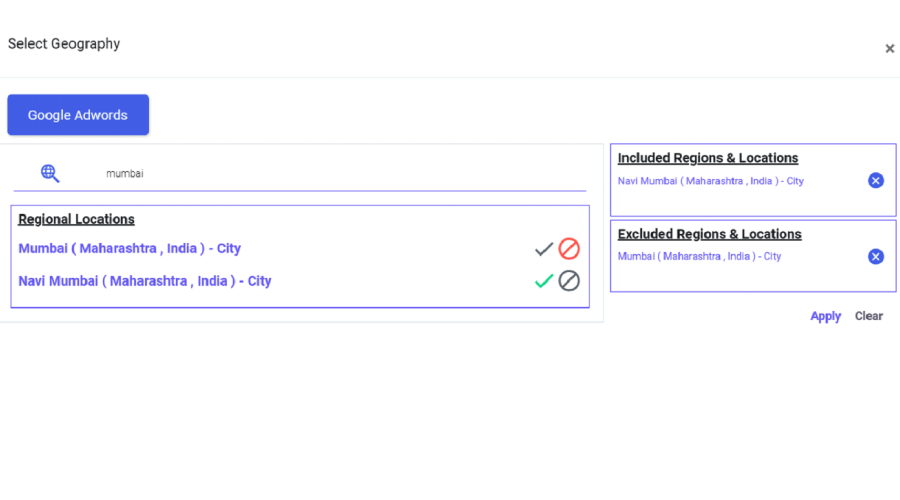
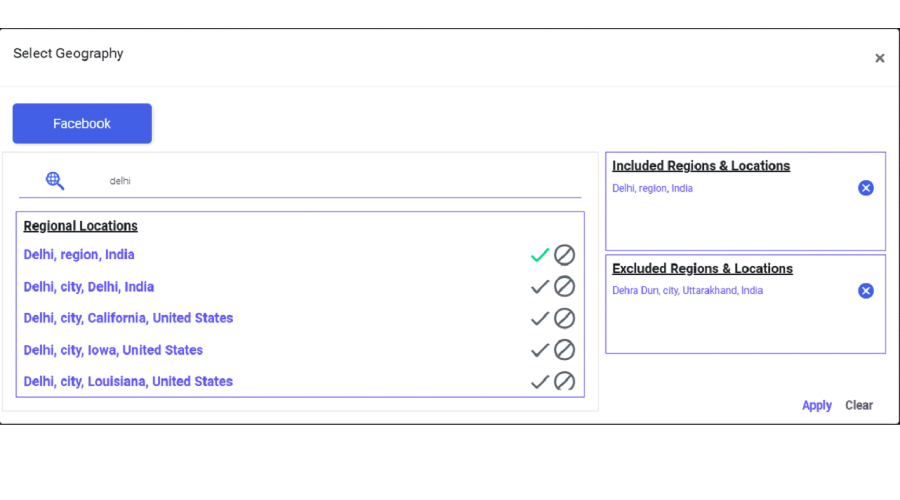
⦁ Add your target locations, you can also exclude the locations which you don’t want to target.
⦁ Your campaign name is essential as it's what you'll use to identify your campaign in Google Search Make sure it's clear and relevant.
⦁ When setting your daily budget, consider how much you're willing to spend each day on your campaign. Other fields for Google Search campaigns remain fixed.
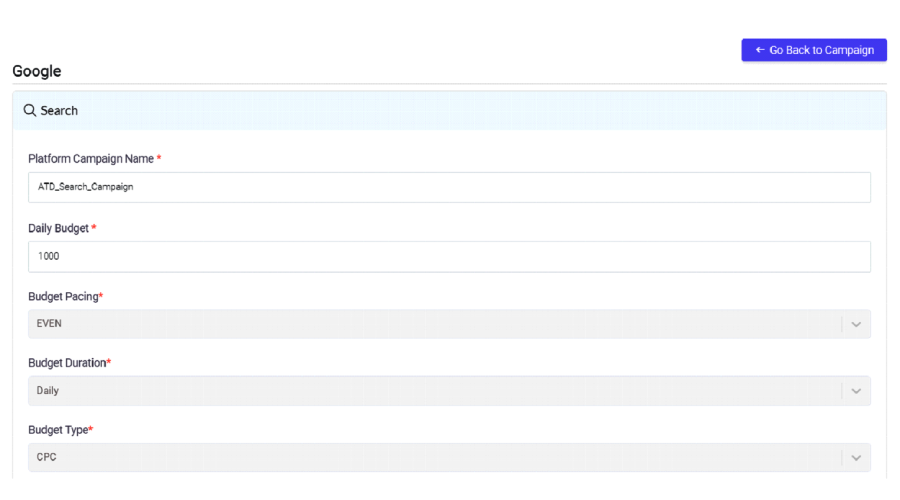
⦁ You'll need to select "CPC" as the budget type for Google Search campaigns. After that, you can enter the landing page URL, which is where users will land after clicking your ad
⦁ You can enter keywords in three categories: exact match, broad match, and phrase match. Keywords help Google understand when to display your ad.
⦁ Negative keywords are words or phrases for which you don't want your ad to appear. It helps you avoid showing your ad to irrelevant audiences.
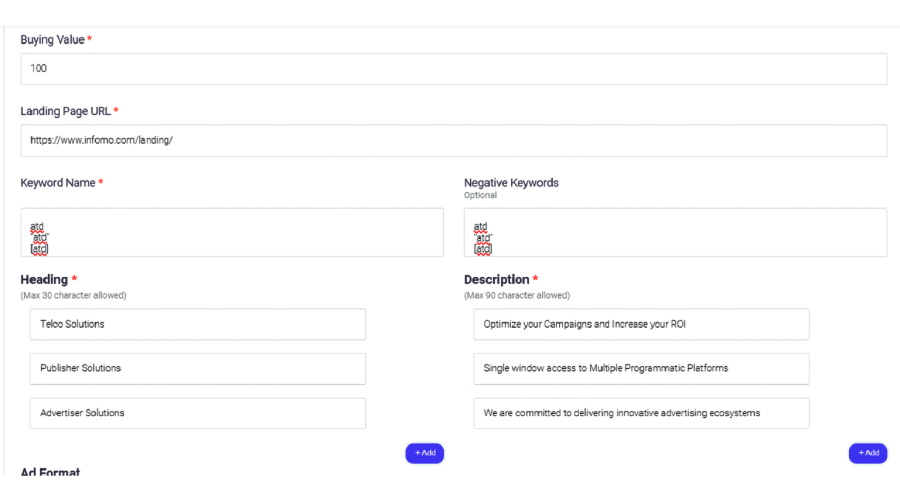
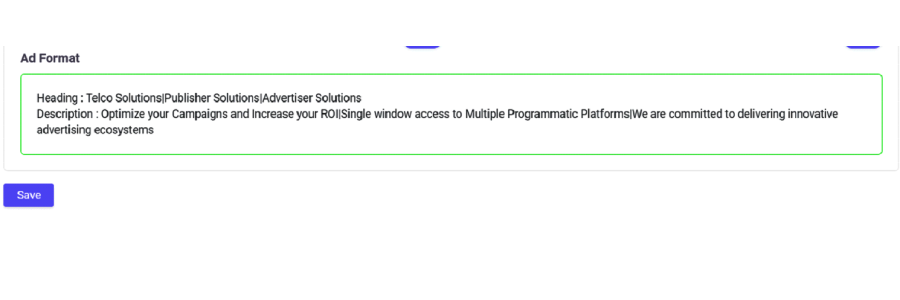
⦁ You should create at least three headings, each not exceeding 30 characters. Additionally, you'll need a minimum of three descriptions, each with a maximum of 90 characters. These components make up your ad content.
⦁ The last step is to save your campaign. Once saved, your campaign will be ready to go live on Google Search.
Creating Campaign for Google - Display Campaign
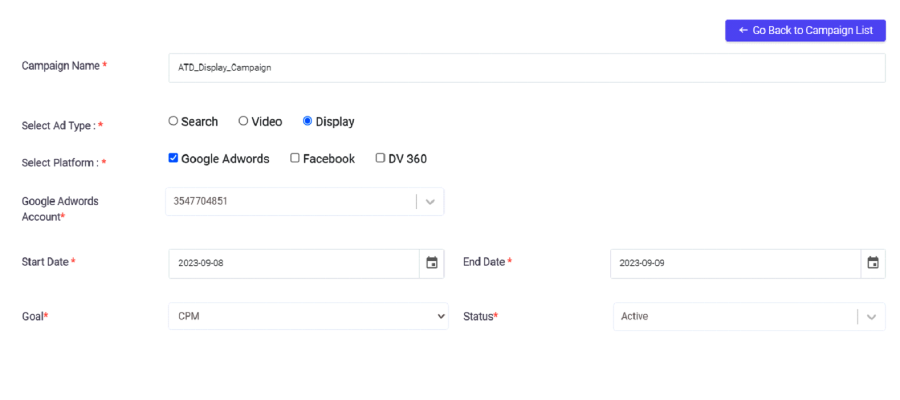
-Start by entering a catchy campaign name. Make it relevant to your goals.
- Choose "Display" as your ad type when setting up the campaign.
- Opt for "Google AdWords" as your platform and add your AdWords account details.
- Pick the start and end dates that align with your campaign schedule.
- Campaign goals can be CPM (Cost Per Mille), CPC (Cost Per Click), CPA (Cost Per Acquisition), and more. Choose the one that suits your objectives.
- Make sure to set the campaign status as "Active" to launch it.
- Proceed to campaign targeting.
- By default, your campaign will target mobile, tablet, and desktop users.
- You can select your campaign's target location.
- You can choose the age range and gender that best fits your target audience.

⦁ You can select audiences from these tabs to further refine your targeting.
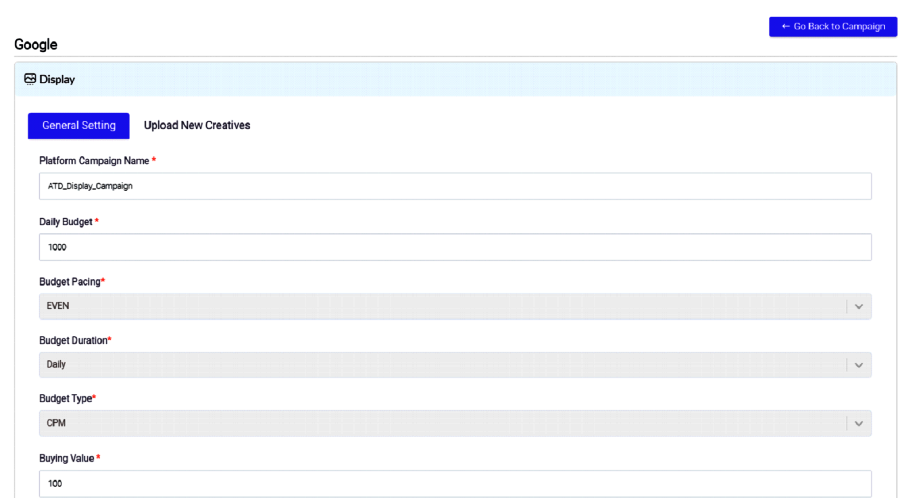
⦁ Add campaign name, this is the name that will appear on Google Display. Make it descriptive and relevant.
⦁ Enter your budget amount. Other fields will remain constant for Google Display.
⦁ You can choose "Even" to evenly distribute your budget over time or "ASAP" for faster spending.
⦁ Select between "Daily" or "Lifetime" budget duration based on your campaign needs.
⦁ You can select between "CPC" (Cost Per Click) or "CPM" (Cost Per Mille) as your budget type.
⦁ For buying value - Enter the value that represents your campaign's cost per click or cost per mille, depending on your budget type.
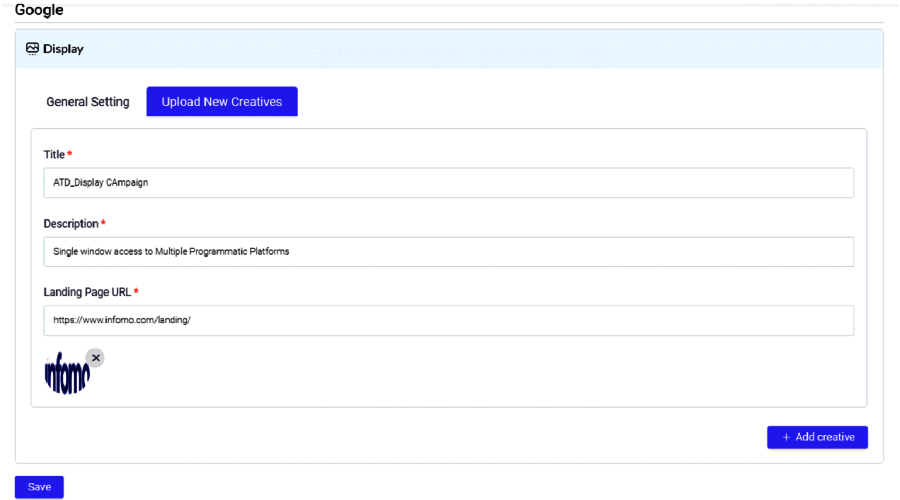
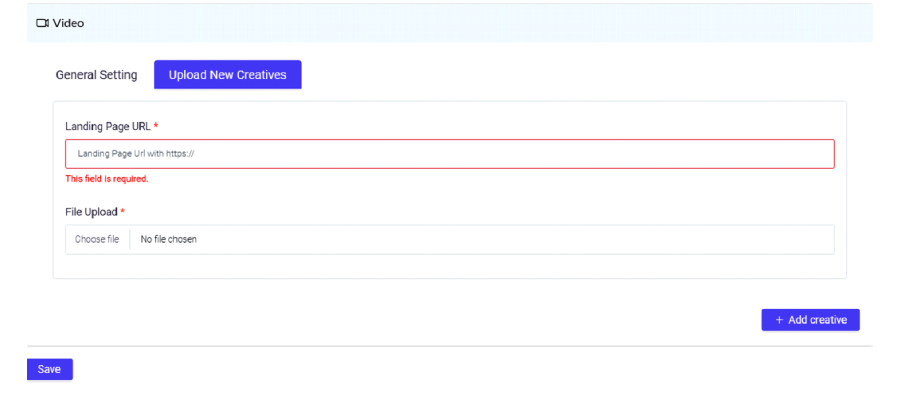
Now click on “Upload New Creatives’
⦁ In title - Write an attention-grabbing title and description. These will be the primary text for your ad creatives.
⦁ Add the URL where users will be directed after clicking on your ad.
⦁ Simply upload your creative image and click "Save" to publish your ad.
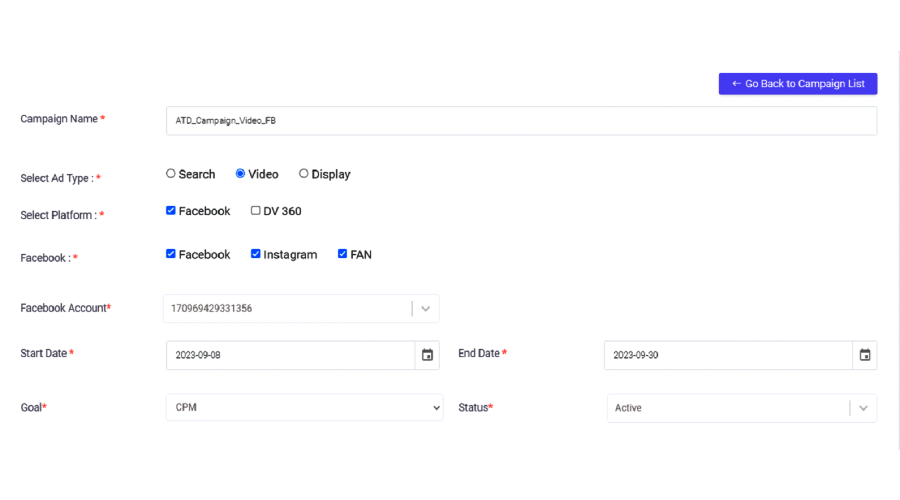
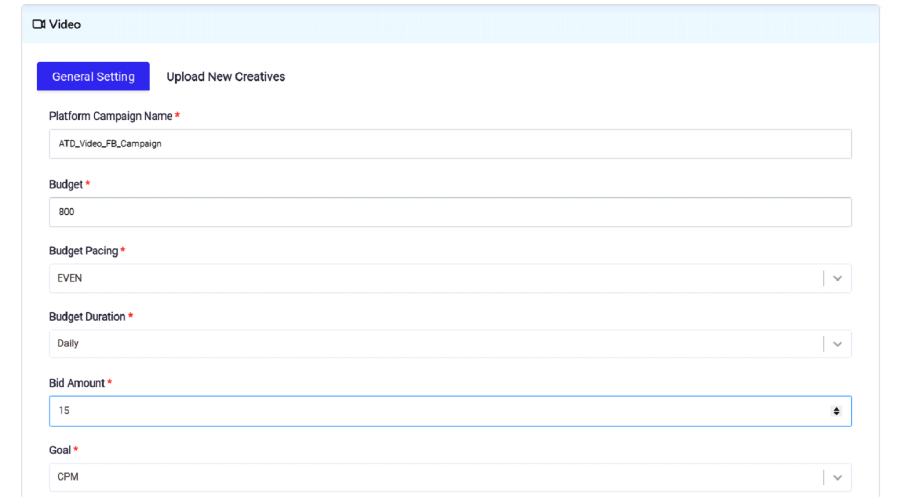
Creation of FB Display Campaign via beki
⦁ Name your campaign something descriptive so you can easily identify it later.
⦁ Choose "Video" as the ad type.
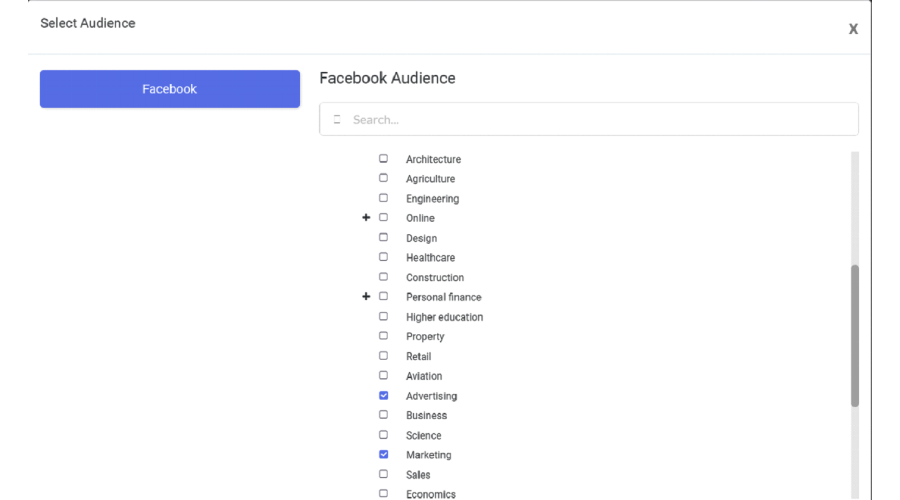
⦁ Under "Facebook," you can choose to target Facebook, Instagram, and the Facebook Audience Network.
⦁ Choose the Facebook ad account you want to use for this campaign.
⦁ Choose the start and end dates for your campaign.
⦁ Depending on your objective, select your campaign goals, such as CPC, CPM, or CPL (Cost Per Lead).
⦁ Set the campaign status to "Active" if you want it to start running immediately.
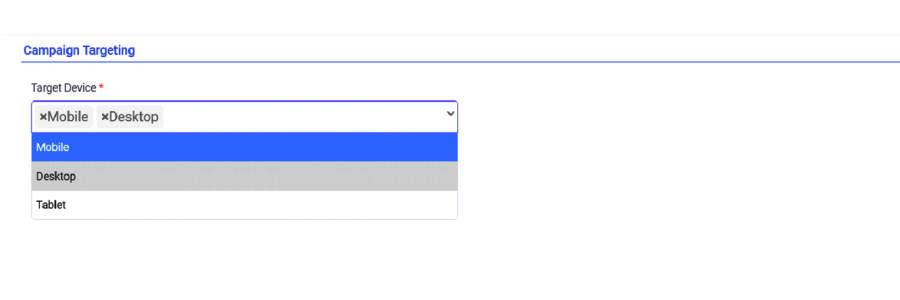
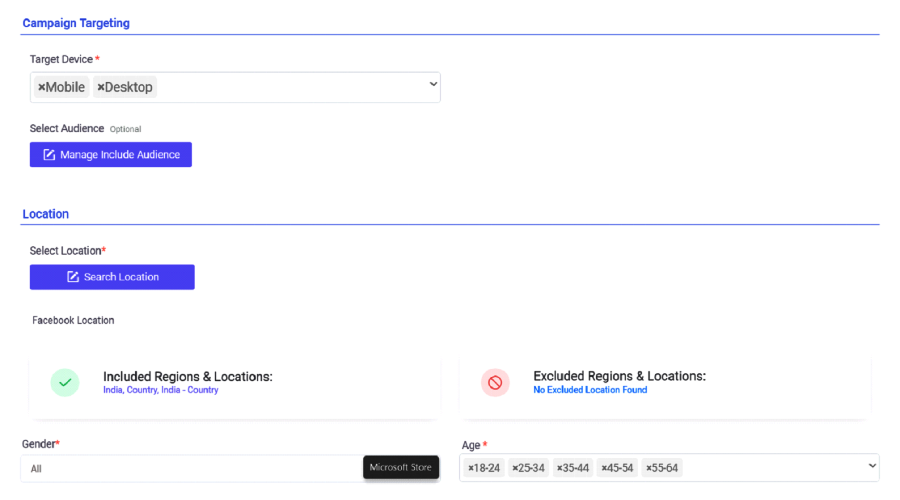
⦁ Choose the devices where you want your ads to appear, such as mobile and desktop.
⦁ Define your target audience from the given list.
⦁ Location: Add the locations you want to target.
⦁ Gender: Select the gender(s) you want to target.
⦁ Add a unique name for your ad set within the campaign.
⦁ Set your daily or lifetime budget for the campaign.
⦁ Choose either "Even" or "ASAP" (accelerated) budget pacing.
⦁ Select "Daily" or "Lifetime" as your budget duration.
⦁ Set your bid amount based on your chosen bidding strategy (e.g., CPC or CPM).
⦁ Choose your budget type (e.g., CPC or CPM) based on your campaign objectives.
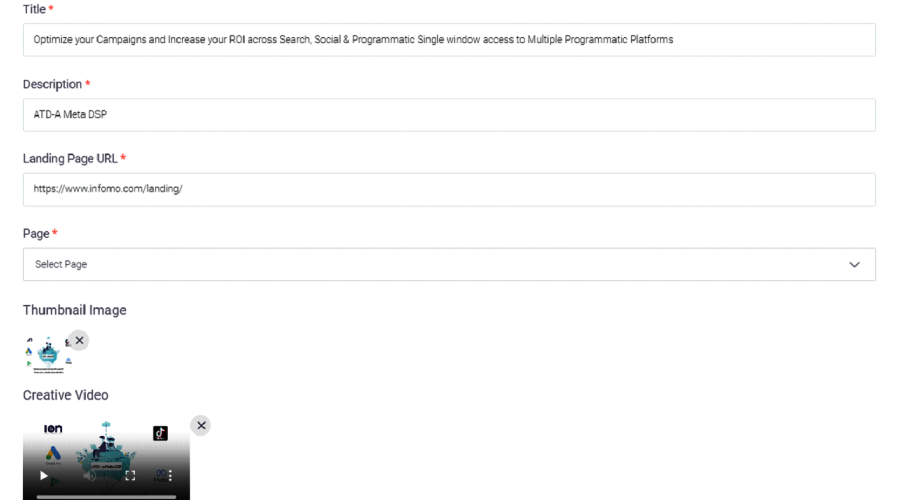
⦁ Title: The primary text that accompanies your video.
⦁ Description: Additional text to provide more context.
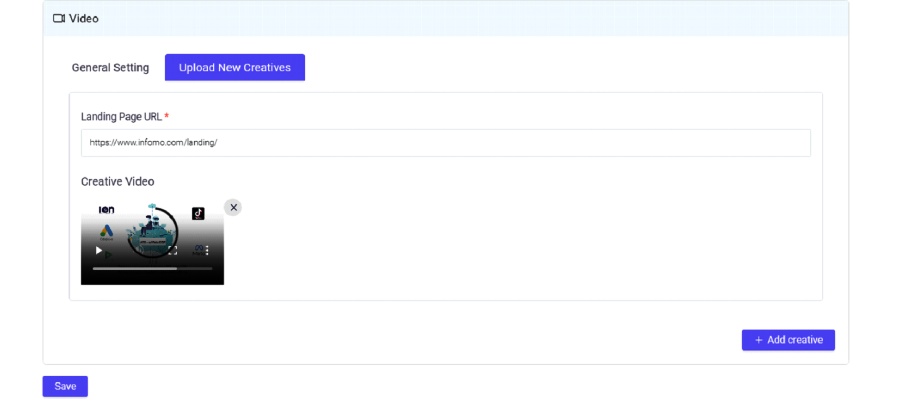
⦁ Landing Page URL: The destination URL where users will be directed when they click on your ad.
⦁ Facebook Page: Choose the Facebook Page associated with your campaign.
⦁ Upload a Video Thumbnail: This is the image that represents your video ad.
⦁ Upload Your Video: Select the video you want to use for your ad.

DV Video Campaign via beki
⦁ Provide a campaign name that describes your campaign.
⦁ Select the ad type as "Video."
⦁ Choose the platform as "DV360."
⦁ Select the appropriate DV360 ad account.
⦁ Set the start and end dates for your campaign.
⦁ Choose your campaign goals, such as CPC (Cost Per Click), CPM (Cost Per Thousand Impressions), CPL (Cost Per Lead), etc.
⦁ Set the status of your campaign as "Active" to start running it immediately.
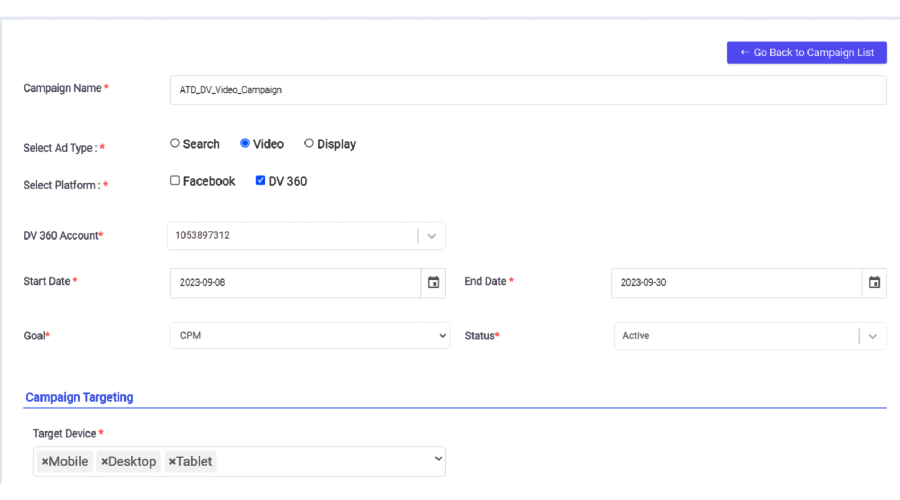
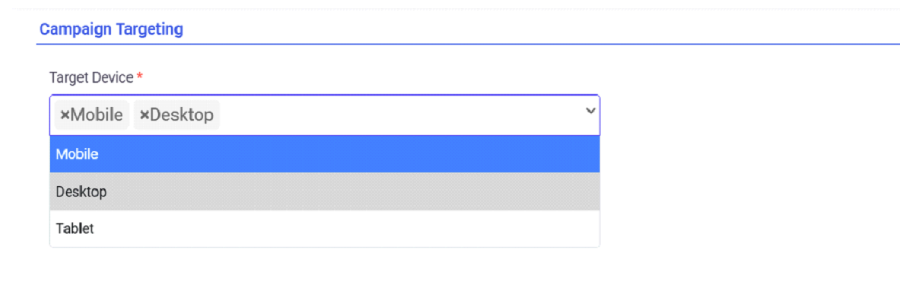
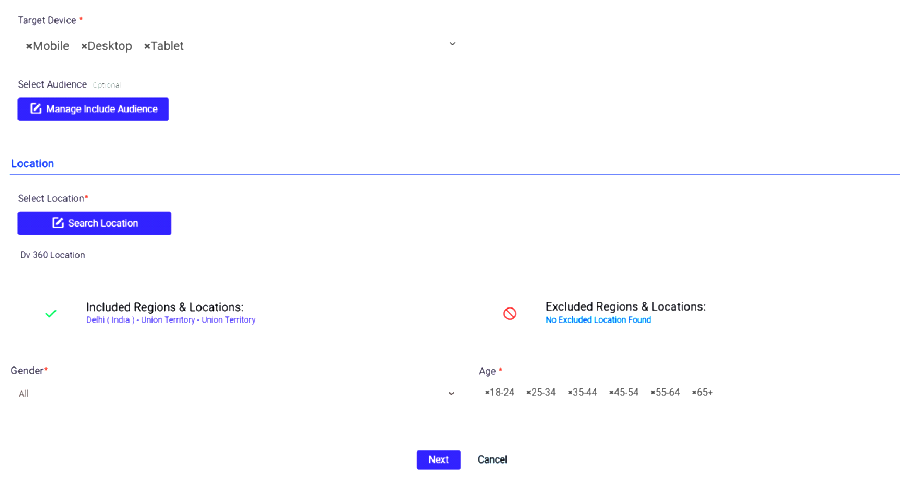
⦁ Go to device targeting and select the devices you want to target, such as mobile, tablet, and desktop.
⦁ Choose your target audience
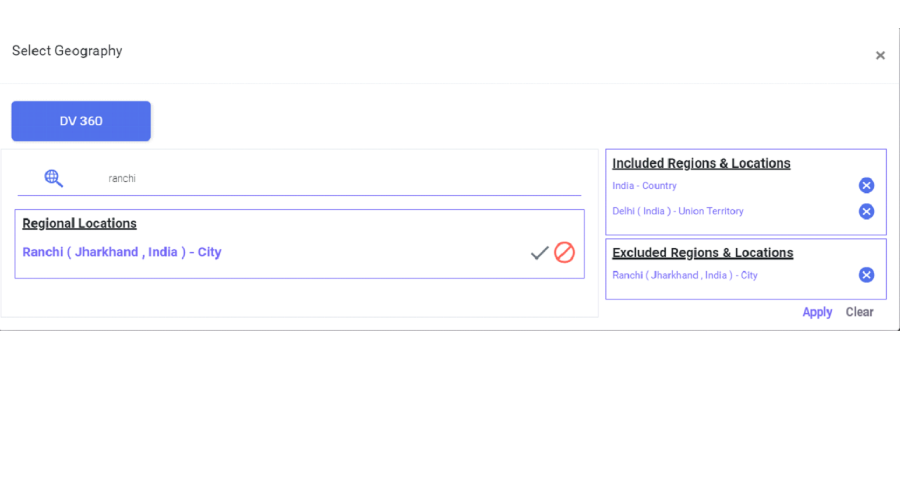
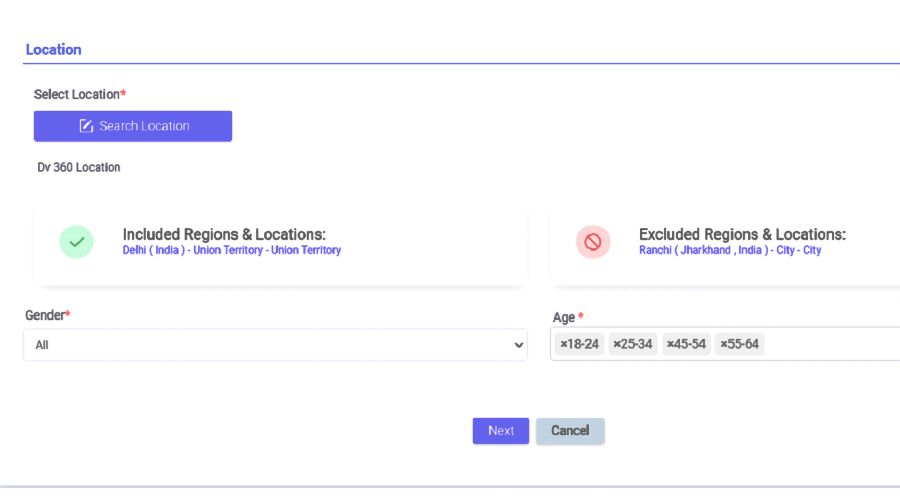
⦁ Define the audience's location.
⦁ Specify gender and age group if relevant to your targeting.
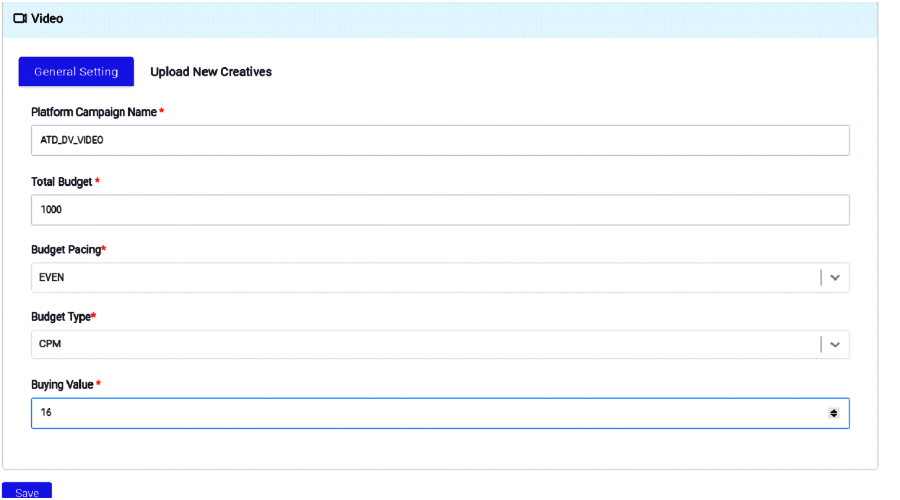
⦁ Add a name for your campaign within the platform (DV360).
⦁ Set your budget for the campaign.
⦁ Choose the budget pacing:
⦁ "Even" for even distribution of budget throughout the campaign.
⦁ "ASAP" (As Soon As Possible) for spending the budget quickly.
⦁ Select the budget type (e.g., CPC or CPM) based on your campaign goals.
⦁ Add the buying value for your selected budget type.
⦁ Click "Save" to confirm your budget settings.
⦁ Add the landing page URL where users will be directed when they click on your video ad.
⦁ Upload your video creative by clicking on the appropriate option.
⦁ Click "Save" or "Publish" to launch your DV360 video campaign.
Creating Campaign on DV 360 - Display
⦁ Enter a descriptive Campaign Name.
⦁ Select "Display" as the Ad Type.
⦁ Choose "DV360" as the Platform.
⦁ Select the appropriate DV360 Ad Account.
⦁ Set the Start and End Dates for your campaign.
⦁ Choose your campaign goals, which can include CPC (Cost Per Click), CPM (Cost Per Mille), CPL (Cost Per Lead), or other relevant goals based on your objectives.
⦁ Set the Campaign Status to "Active."

⦁ Go to the "Device Targeting" section.
⦁ Select the devices you want to target, such as Mobile, Tablet, and Desktop.
⦁ Select your target audience based on demographics, interests, behaviors, or other criteria.
⦁ Add your target location, gender, and age.
⦁ Click the "Next" button to proceed.
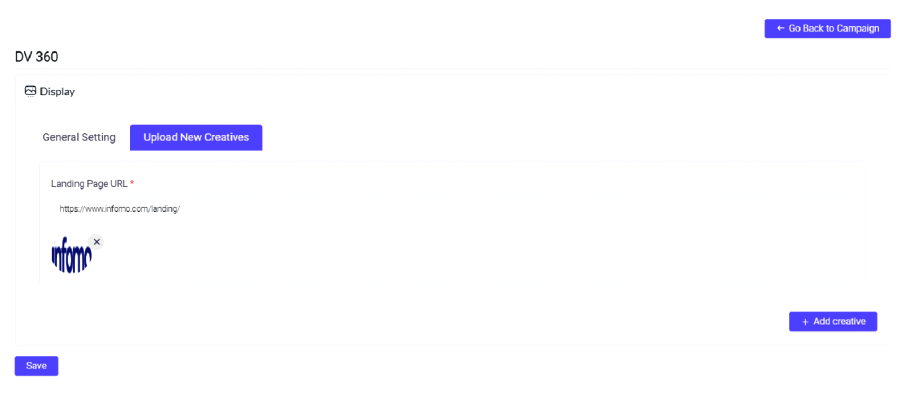
⦁ Enter the URL of the landing page where users will be directed when they click on your ad.
⦁ Upload the image or creative assets for your display ad.
⦁ Click the "Save" or "Publish" button to launch your DV360 display campaign.
Campaign Optimization
How to map the campaign to goals?
Access Your Dashboard: Start by opening your beki dashboard. This is your central hub for managing your advertising campaigns.
Navigate to Goals: Look for the "Goals" option in the menu. It's located on the sidebar. Click on it to begin setting up your goals.
Create a New Goal: To create a new goal, click on the "+Goals" button. This action will initiate the goal-setting process.
Name Your Goal: Give your goal a name. This can be something easy to remember, like "Summer Sales Campaign" or "Product Launch."
Choose Categories: Select a category and sub-category for your goal. These categories help organize your goals. For instance, if you're promoting a new tech product, you might choose "Technology" as the category and "Gadgets" as the sub-category.
Select Primary Goal: Now, you need to define your primary goal. This could be based on metrics like CPM (Cost Per Mille), clicks, CPC (Cost Per Click), or other relevant metrics. Choose the one that aligns with your campaign's objectives.
Set Primary Goal Value: Specify a target value for your primary goal. For example, if your primary goal is CPM, enter the target CPM value that you aim to achieve.
Secondary Goal (Optional): If your campaign has additional objectives or key performance indicators (KPIs), you can set a secondary goal. For instance, if your primary goal is CPM, your secondary goal might be CTR (Click-Through Rate) or CPC (Cost Per Click). Enter the desired value for your secondary goal if applicable.
Activate Your Goal: Make sure to set the status of your goal as "Active." This ensures that it's actively tracking and guiding your campaign. Don't forget to save your goal settings.
Map Campaigns to Goals: Now, under the "Goals" section, you can select the "Unmapped Campaigns" tab. Here, you'll see a list of your campaigns that are not yet linked to any specific goal.
Select Campaigns to Map: Go through your campaign list and choose the ones you want to link to the goal you just created. By doing this, you're aligning each campaign with its specific objectives.
How to approve/reject recommendations
Access Your beki Dashboard: Begin by logging into your beki account.
Locate the Optimizer: In the left-hand menu of your dashboard, you will find an option labelled "Optimizer." Click on this option.
Identify the Recommendation: If there is an active recommendation awaiting your attention, it will be prominently displayed on the Optimizer screen
Access Recommendation Details: To gain a comprehensive understanding of the recommendation, click on the current recommendation. This will reveal the specific goals associated with it, along with corresponding action buttons.
Take Action: Now, it's time to make a decision. Click on the action button, triggering a pop-up window that displays all available recommendations.
Choose Approval or Rejection: If you agree with a recommendation and wish to implement it, select the green tick button to approve it. If you find the recommendation unsuitable for your needs, choose the red cross button to reject it.
How to check recommendation history
Start by selecting "Optimizer" from the menu on the left-hand side of your screen.
Once you're in the optimizer section, look for the "History" tab at the top of the page.
Click on that "History" tab, You'll now be able to see a neat list of all your past recommendations, along with their current status.